Spark在BDAS生态系统中处于核心地位,其他相关组件通过Spark实现对分布式并行处理任务的程序支持。本章试着从Spark内核代码实现的重要部分,来进一步剖析Spark,以加深读者对Spark设计思想与实现细节的理解。
4.1 Spark代码布局
4.1.1 Spark源码布局简介
图4-1列出了Spark的代码结构及包含的重点功能模块。读者可以通过这张图,可以对Spark的主要构成及代码布局产生直观的印象。 这些模块也构成了Spark架构中的的功能组件。根据Spark的代码布局,读者可以自行查阅源码,这对于掌握Spark的实现细节,加深对Spark实现机制的理解都是非常有必要的。
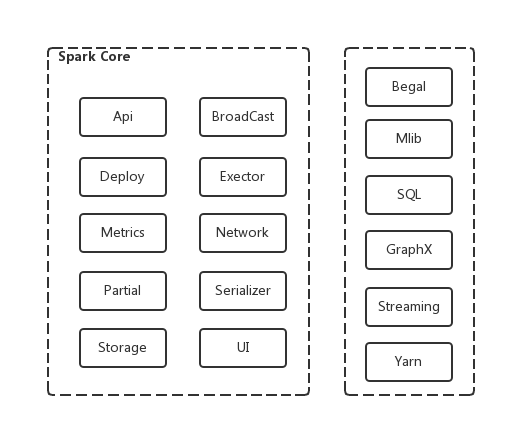
图4-1 Spark code layout
4.1.1 Spark Core内模块概述
下面对Spark core中的重点组成模块功能一一介绍:
(1)Api: Java,Pathon及R语言API的实现。
(2)Broadcast: 包含广播变量的实现。
(3)Deploy:Spark部署与启动运行的实现。
(4)Executor:worker节点负责计算部分的实现。
(5)Metrics:运行时状态监控的实现。
(6)Network:集群通信实现。
(7)Partial:近似评估代码。
(8)Serializer:序列化模块。
(9)Storage:存储模块。
(10)UI:监控界面的代码逻辑实现。
4.1.2 Spark Core外模块概述
下面是core以外的其他模块:
(1)Begal:Pregel是Google的图计算框架,Begal是基于Spark的轻量级Pregel实现。
(2)Mlib:机器学习算法库。
(3)SQL:SQL on Spark,提供大数据上的查询功能。
(4)GraphX:图计算模块的实现。
(5)Streaming:流处理框架Spark Streaming的实现。
(6)Yarn:Spark on Yarn的部分实现。
4.2 Spark执行主线[RDD->task]剖析
在前面一章中详细讲过,当Action算子被调用之后,Spark作业就开始进入切分调度执行的几个重点执行阶段。具体如图4-2所示,此处不再赘述:
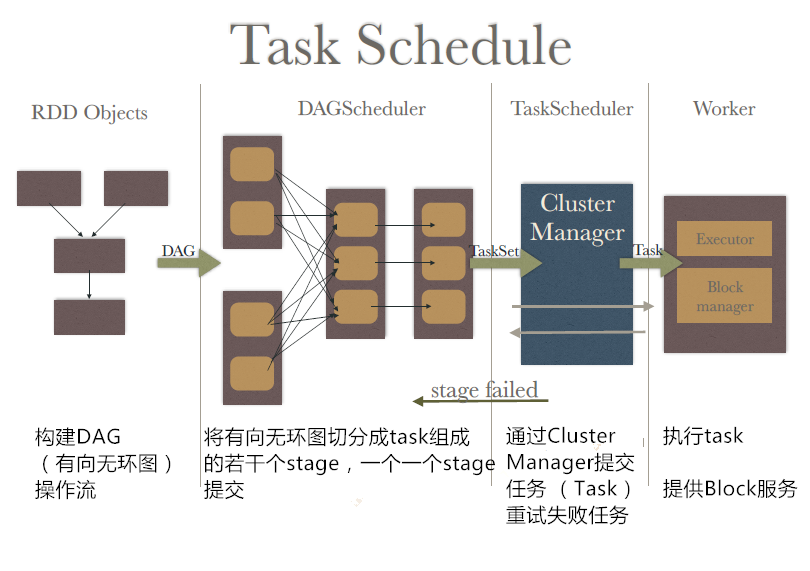
图4-2 Spark执行主要阶段
在Spark中job作业从提交到切分成task在worker节点上执行,这个过程可以将其称之为Spark执行主线,这条主线是Spark原理的重点。在前面几章主要从原理的层面揭示了job提交之后会发生什么。本节将带领读者从源码层面深入剖析这条执行主线。通过本节,读者势必会对Spark的重点部分理解更加深入。
4.2.1 从RDD到DAGScheduler
因为Action算子会触发Job的提交,所以下面还是以count函数为例,来剖析整个执行主线。注:[]中为代码片段所在文件名。
[org.apache.spark.rdd.RDD]
[RDD.scala]
/**
* Return the number of elements in the RDD.
*/
def count(): Long = sc.runJob(this, Utils.getIteratorSize _).sum
很明显,在count函数中调用了runJob,runJob函数的实现位于org.apache.spark.SparkContext类中。
[SparkContext.scala]

def runJob[T, U: ClassTag](
   rdd: RDD[T],
   func: (TaskContext, Iterator[T]) => U,
   partitions: Seq[Int],
   resultHandler: (Int, U) => Unit): Unit = {
      if (stopped.get()) {
         throw new IllegalStateException("SparkContext has been shutdown")
      }
      val callSite = getCallSite
      val cleanedFunc = clean(func)
      logInfo("Starting job: " + callSite.shortForm)
      if (conf.getBoolean("spark.logLineage", false)) {
      logInfo("RDD's recursive dependencies:\n" + rdd.toDebugString)
   }
   /* 注意!从此处进入DAGScheduler阶段 */
   dagScheduler.runJob(rdd, cleanedFunc, partitions, callSite, resultHandler, localProperties.get)
   progressBar.foreach(_.finishAll())
   rdd.doCheckpoint()
}
从上述SparkContext.scala的runJob实现可以发现,其中调用了org.apache.spark.scheduler.DAGScheduler类中的runJob函数,说明RDD Graph处理完成,进入了DAGScheduler的处理阶段。
4.2.2 从DAGScheduler到TaskScheduler
下面介绍进入DAGScheduler之后的处理阶段,限于篇幅,在代码部分省略了部分不太重要的代码,读者在阅读本章后,可以使用IntellijIDEA阅读更完整的代码,建立更深入的理解。
[DAGScheduler.scala]
  def runJob[T, U](
    rdd: RDD[T],
    func: (TaskContext, Iterator[T]) => U,
    partitions: Seq[Int],
    callSite: CallSite,
    resultHandler: (Int, U) => Unit,
    properties: Properties): Unit = {
     val start = System.nanoTime

     //注意! 这里继续调用了同一文件中的submitJob函数
     val waiter = submitJob(rdd, func, partitions, callSite, resultHandler, properties)
     waiter.awaitResult() match {
        case JobSucceeded =>
           ...
        case JobFailed(exception: Exception) =>
           ...
	...
    }
  }


def submitJob[T, U](
    rdd: RDD[T],
    func: (TaskContext, Iterator[T]) => U,
    partitions: Seq[Int],
    callSite: CallSite,
    resultHandler: (Int, U) => Unit,
    properties: Properties): JobWaiter[U] = {
     // Check to make sure we are not launching a task on a partition that does not exist.
     val maxPartitions = rdd.partitions.length
     partitions.find(p => p >= maxPartitions || p < 0).foreach { p =>
      ...
     }

     val jobId = nextJobId.getAndIncrement()
     ...

     assert(partitions.size > 0)
     val func2 = func.asInstanceOf[(TaskContext, Iterator[_]) => _]
     val waiter = new JobWaiter(this, jobId, partitions.size, resultHandler)

     //注意,此处为Spark1.5.0中通信机制的新实现,发送JobSubmitted消息
     eventProcessLoop.post(JobSubmitted(
       jobId, rdd, func2, partitions.toArray, callSite, waiter,
       SerializationUtils.clone(properties)))
     waiter
}
下面列出JobSubmitted消息接收后的处理:
private def doOnReceive(event: DAGSchedulerEvent): Unit = event match {
     //处理消息JobSubmitted
     case JobSubmitted(jobId, rdd, func, partitions, callSite, listener, properties) =>
        //调用handleJobSubmitted函数
        dagScheduler.handleJobSubmitted(jobId, rdd, func, partitions, callSite, listener, properties)
     case ...
     ...
在处理JobSubmitted的代码中,可以看到Spark继续调用了同一文件中的handleJobSubmitted函数,下面列出了该函数的重点代码片段,为了突出重点,略去了部分无关代码。
private[scheduler] def handleJobSubmitted(jobId: Int,
    finalRDD: RDD[_],
    func: (TaskContext, Iterator[_]) => _,
    partitions: Array[Int],
    callSite: CallSite,
    listener: JobListener,
    properties: Properties) {

     var finalStage: ResultStage = null
     try {

        //将最后一个stage切分出来作为finalStage
        finalStage = newResultStage(finalRDD, func, partitions, jobId, callSite)
     } catch {
     ...
     }

     val job = new ActiveJob(jobId, finalStage, callSite, listener, properties)
     clearCacheLocs()
     logInfo("Got job %s (%s) with %d output partitions".format(job.jobId, callSite.shortForm, partitions.length))

     logInfo("Final stage: " + finalStage + " (" + finalStage.name + ")")
     logInfo("Parents of final stage: " + finalStage.parents)

     //检验finalStage是否有依赖的父辈stage未被计算完成
     logInfo("Missing parents: " + getMissingParentStages(finalStage))

     val jobSubmissionTime = clock.getTimeMillis()
     jobIdToActiveJob(jobId) = job
     activeJobs += job
     finalStage.resultOfJob = Some(job)
     val stageIds = jobIdToStageIds(jobId).toArray
   ...

     //提交finalStage
     submitStage(finalStage)

     submitWaitingStages()
}
下面看看finalStage被提交之后,Spark的处理逻辑。
private def submitStage(stage: Stage) {
     val jobId = activeJobForStage(stage)
     if (jobId.isDefined) {

     ...

     if (!waitingStages(stage) && !runningStages(stage) && !failedStages(stage)) {
         val missing = getMissingParentStages(stage).sortBy(_.id)
         logDebug("missing: " + missing)
         if (missing.isEmpty) {
            ...
            //如果stage所有依赖的父辈stage已结算完成,则直接提交stage
            submitMissingTasks(stage, jobId.get)
     } else {
        for (parent <- missing) {

          //如果stage依赖的父辈stage未被计算完成,则递归调用本函数
          submitStage(parent)
        }
        waitingStages += stage
        ...
}
在上面程序片段中,最后调用了submitMissingTasks函数提交stage。由下面的程序片段可以看出,此时DAGScheduler将task的调度交给了TaskScheduler,调用TaskSchedule中的submitTasks函数将task数组封装为TaskSet对象,然后提交TaskSet。具体如下:
private def submitMissingTasks(stage: Stage, jobId: Int) {
     logDebug("submitMissingTasks(" + stage + ")")
     // Get our pending tasks and remember them in our pendingTasks entry
     stage.pendingPartitions.clear()
     ...

     if (tasks.size > 0) {
        logInfo("Submitting " + tasks.size + " missing tasks from " + stage + " (" + stage.rdd + ")")
        stage.pendingPartitions ++= tasks.map(_.partitionId)
        logDebug("New pending partitions: " + stage.pendingPartitions)

        //注意! 这里进入了task scheduler阶段来提交TaskSet
	  taskScheduler.submitTasks(new TaskSet(tasks.toArray, stage.id, stage.latestInfo.attemptId, stage.firstJobId, properties))
     ...


  ---------------------------
[TaskSchedulerImpl.scala]
  ---------------------------
override def submitTasks(taskSet: TaskSet) {
     val tasks = taskSet.tasks
     logInfo("Adding task set " + taskSet.id + " with " + tasks.length + " tasks")
     this.synchronized {
        //生成TaskSetManager来执行taskset内的调度
        val manager = createTaskSetManager(taskSet, maxTaskFailures)
        val stage = taskSet.stageId
        val stageTaskSets = taskSetsByStageIdAndAttempt.getOrElseUpdate(stage, new HashMap[Int, TaskSetManager])
        stageTaskSets(taskSet.stageAttemptId) = manager

     ...

     //注意!在这里请求执行的计算资源
     backend.reviveOffers()

}
上面submitTasks函数中最后调用了org.apache.spark.scheduler.cluster.CoarseGrainedSchedulerBackend类中的reviveOffers函数来请求计算资源,下面列出该函数的实现:
[CoarseGrainedSchedulerBackend.scala]

override def reviveOffers() {
     //这里发送了ReviveOffers的消息
     driverEndpoint.send(ReviveOffers)
}
下面我们继续追寻ReviveOffers消息的处理逻辑,具体如下:
[CoarseGrainedSchedulerBackend.scala]

override def receive: PartialFunction[Any, Unit] = {
    case StatusUpdate(executorId, taskId, state, data) =>
      scheduler.statusUpdate(taskId, state, data.value)
      if (TaskState.isFinished(state)) {
        executorDataMap.get(executorId) match {
          case Some(executorInfo) =>
            executorInfo.freeCores += scheduler.CPUS_PER_TASK
            makeOffers(executorId)
          case None =>
            // Ignoring the update since we don't know about the executor.
            logWarning(s"Ignored task status update ($taskId state $state) " +
              s"from unknown executor with ID $executorId")
        }
      }

    case ReviveOffers =>
      //注意!调用makeOffers函数来处理ReviveOffers消息
      makeOffers()

    case KillTask =>
      ...


private def makeOffers() {
    // Filter out executors under killing
    val activeExecutors = executorDataMap.filterKeys(!executorsPendingToRemove.contains(_))

  //获取可用的计算资源
    val workOffers = activeExecutors.map { case (id, executorData) =>
      new WorkerOffer(id, executorData.executorHost, executorData.freeCores)
    }.toSeq

    //启动task
    launchTasks(scheduler.resourceOffers(workOffers))
  }

  private def launchTasks(tasks: Seq[Seq[TaskDescription]]) {
    for (task <- tasks.flatten) {
      val serializedTask = ser.serialize(task)
      if (serializedTask.limit >= akkaFrameSize - AkkaUtils.reservedSizeBytes) {
        scheduler.taskIdToTaskSetManager.get(task.taskId).foreach { taskSetMgr =>
          try {
            ...
      ...

     }
      else {
        val executorData = executorDataMap(task.executorId)
        executorData.freeCores -= scheduler.CPUS_PER_TASK

        //注意!发送LaunchTask消息来执行启动task操作
        executorData.executorEndpoint.send(LaunchTask(new SerializableBuffer(serializedTask)))
      }
    }
  }
### 4.2.3 从TaskScheduler到worker节点
在上面程序片段中launchTasks函数最后发送LaunchTask消息来完成对task的启动操作,具体在org.apache.spark.executor.Executor中得到了完成。下面给出Executor.scala中的重点相关程序片段:
[Executor.scala]

private[spark] class Executor(
    executorId: String,
    executorHostname: String,
    env: SparkEnv,
    userClassPath: Seq[URL] = Nil, isLocal: Boolean = false)
  extends Logging {

  ...

   //启动worker节点上的thread pool
     private val threadPool = ThreadUtils.newDaemonCachedThreadPool("Executor task launch worker")
     private val executorSource = new ExecutorSource(threadPool, executorId)
  ...

def launchTask(
    context: ExecutorBackend,
    taskId: Long,
    attemptNumber: Int,
    taskName: String,
    serializedTask: ByteBuffer): Unit = {

   //将task包装成TaskRunner
   val tr = new TaskRunner(context, taskId = taskId, attemptNumber = attemptNumber, taskName, serializedTask)

   //将TaskRunner加入running task list
     runningTasks.put(taskId, tr)

     //threadpool执行该task
     threadPool.execute(tr)
  }
至此,从Job提交到最终task在worker节点上执行的主线已剖析完。
4.3 Client,Master和Worker交互过程剖析
4.3.1 交互流程概览
在上一节我们沿着作业从提交到切分成task在worker节点上执行的一条主线来剖析了相关代码。本节我们将带领读者从另一个角度,即 Client, Master和worker之间交互的角度来剖析代码。 交互细节如图4-3所示:
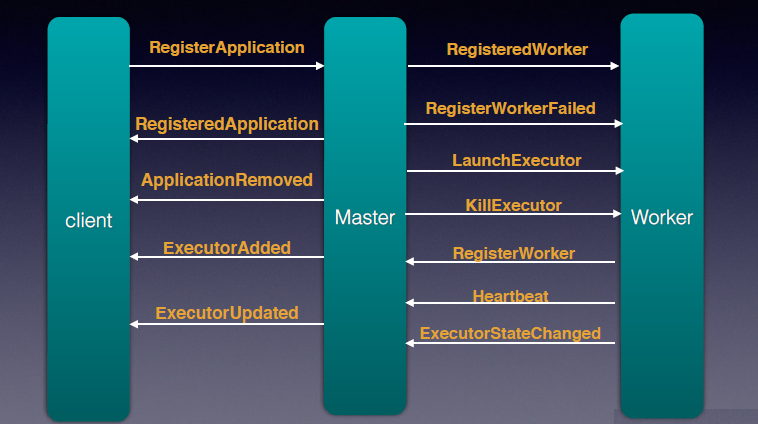
图4-3 Client、Master和Worker之间交互
4.3.2 交互过程调用
下面,我们继续从org.apache.spark.SparkContext类中的启动调用序列看起:
[SparkContext.scala]
...
// start TaskScheduler after taskScheduler sets DAGScheduler reference in DAGScheduler's
// constructor
//启动task scheduler
_taskScheduler.start()
...
TaskScheduler的start函数实现在org.apache.spark.scheduler.TaskSchedulerImpl类中。
[TaskSchedulerImpl.scala]
...
override def start() {
  //启动backend
  backend.start()
...
下面接着给出上面提及的backend的启动实现关键代码,位于org.apache.spark.scheduler.cluster.SparkDeploySchedulerBackend中,具体如下:
[SparkDeploySchedulerBackend.scala]
...
override def start() {
     super.start()
     launcherBackend.connect()
     ...

     client = new AppClient(sc.env.rpcEnv, masters, appDesc, this, conf)
     //生成并启动Client
   client.start()
继续来看看org.apache.spark.deploy.client.AppClient的启动及关键部分代码:
[AppClient.scala]
  ...
  def start() {
     //生成ClientEndpoint对象,并启动rpcEndpoint
     endpoint = rpcEnv.setupEndpoint("AppClient", new ClientEndpoint(rpcEnv))
  }

  [ClientEndpoint类的部分实现]

  override def onStart(): Unit = {
    try {

	//向Master注册
      registerWithMaster(1)
    } catch {
  ...
其中,registerWithMaster调用tryRegisterAllMasters函数来完成注册,如下:
[AppClient.scala]
...
private def registerWithMaster(nthRetry: Int) {
       //调用tryRegisterAllMasters实现
       registerMasterFutures = tryRegisterAllMasters()
  ...

private def tryRegisterAllMasters(): Array[JFuture[_]] = {
	...
	val masterRef = rpcEnv.setupEndpointRef(Master.SYSTEM_NAME, masterAddress, Master.ENDPOINT_NAME)

      //AppClient向Master发送RegisterApplication消息
	masterRef.send(RegisterApplication(appDescription, self))
下面我们来看看org.apache.spark.deploy.master.Master收到消息之后执行了那些操作。
[Master.scala]

...
//注册Application
  case RegisterApplication(description, driver) => {
    // TODO Prevent repeated registrations from some driver
    if (state == RecoveryState.STANDBY) {
      // ignore, don't send response
    } else {
      logInfo("Registering app " + description.name)
      val app = createApplication(description, driver)

	//注册application
      registerApplication(app)
      logInfo("Registered app " + description.name + " with ID " + app.id)

	//持久化app的元数据信息,可以选择持久化到哪里,或者不持久化
      persistenceEngine.addApplication(app)
      driver.send(RegisteredApplication(app.id, self))

	//执行调度为待分配资源的Application分配资源,注意在每次有新的Application加入或者新的资源加入时都会调用schedule进行调度
      schedule()
    }
  }


private def schedule(): Unit = {
     if (state != RecoveryState.ALIVE) { return }
     // Drivers take strict precedence over executors
     val shuffledWorkers = Random.shuffle(workers) // Randomization helps balance drivers
   //注意这里的条件
     for (worker <- shuffledWorkers if worker.state == WorkerState.ALIVE) {
     for (driver <- waitingDrivers) {
        if (worker.memoryFree >= driver.desc.mem && worker.coresFree >=    driver.desc.cores) {
          launchDriver(worker, driver)
          waitingDrivers -= driver
        }
      }
     }
     //启动Executor
     startExecutorsOnWorkers()
  }
schedule() 为处于待分配资源的Application分配资源。在每次有新的Application加入或者新的资源加入时都会调用schedule进行调度。为Application分配资源选择worker(executor),一般有两种策略:
(1)尽量打散:即一个Application尽可能多的分配到不同的节点。这个可以通过设置spark.deploy.spreadOut来实现。默认值为true,即尽量打散。
(2)尽量集中:即一个Application尽量分配到尽可能少的节点。
对于同一个Application,它在一个worker上只能拥有一个executor,但这个executor可能拥有多于1个的core的数量。
下面来看看launchExector的代码实现。
[Master.scala]
private def launchExecutor(worker: WorkerInfo, exec: ExecutorDesc): Unit = {
   logInfo("Launching executor " + exec.fullId + " on worker " + worker.id)
 //更新worker的信息,可用core数和memory数减去本次分配的executor占用的
   worker.addExecutor(exec)

   //向worker节点发送LaunchExecutor消息请求启动Executor
   worker.endpoint.send(LaunchExecutor(masterUrl, exec.application.id, exec.id, exec.application.desc, exec.cores, exec.memory))

 //通知AppClient已添加了Executor
   exec.application.driver.send(ExecutorAdded(exec.id, worker.id, worker.hostPort, exec.cores, exec.memory))
}
接下,我们继续剖析worker节点收到消息后的主要操作,代码片段如下:
[worker.scala]
...
override def receive: PartialFunction[Any, Unit] = synchronized {
...

//处理LaunchExecutor消息
case LaunchExecutor(masterUrl, appId, execId, appDesc, cores_, memory_) =>

  if (masterUrl != activeMasterUrl) {
    logWarning("Invalid Master (" + masterUrl + ") attempted to launch executor.")
  } else {

...

//创建executor工作目录
    val executorDir = new File(workDir, appId + "/" + execId)
    if (!executorDir.mkdirs()) {
      throw new IOException("Failed to create directory " + executorDir)
    }
...

  //包装成ExecutorRunner
  val manager = new ExecutorRunner(
        appId,
        execId,
        appDesc.copy(command = Worker.maybeUpdateSSLSettings(appDesc.command, conf)),
        cores_,
        memory_,
        self,
        workerId,
        host,
        webUi.boundPort,
        publicAddress,
        sparkHome,
        executorDir,
        workerUri,
        conf,
        appLocalDirs, ExecutorState.LOADING)
executors(appId + "/" + execId) = manager

//启动ExecutorRunner
  manager.start()

//累计资源使用量
  coresUsed += cores_
  memoryUsed += memory_

//向Master发ExecutorStateChanged消息
  sendToMaster(ExecutorStateChanged(appId, execId, manager.state, None, None))
  ...
由上面程序解析可以看出,worker接收到来自Master的LaunchExecutor的消息后,会创建org.apache.spark.deploy.worker.ExecutorRunner。Worker本身会记录本身资源的使用情况,包括已经使用的CPU core数,memory等,但是这个统计只是为了web UI的展现。Master本身会记录Worker的资源使用情况,无需Worker汇报。Worker与Master之间的心跳的目的仅仅是为了报活,不会携带其他的信息。
  下面,我们继续深入ExecutorRunner类,分析下start函数实现。
[ExecutorRunner.scala]
private[worker] def start() {
//创建thread,其中run函数调用了fetchAndRunExecutor函数实现
workerThread = new Thread("ExecutorRunner for " + fullId) {
override def run() { fetchAndRunExecutor() }
}
//启动thread
workerThread.start()
// Shutdown hook that kills actors on shutdown.
shutdownHook = ShutdownHookManager.addShutdownHook { () =>
killProcess(Some("Worker shutting down")) }
}
private def fetchAndRunExecutor() {
try {
// Launch the process
val builder = CommandUtils.buildProcessBuilder(appDesc.command, new SecurityManager(conf),
memory, sparkHome.getAbsolutePath, substituteVariables)
val command = builder.command()
val formattedCommand = command.asScala.mkString("\"", "\" \"", "\"")
logInfo(s"Launch command: $formattedCommand")
builder.directory(executorDir)
builder.environment.put("SPARK_EXECUTOR_DIRS", appLocalDirs.mkString(File.pathSeparator))
// In case we are running this from within the Spark Shell, avoid creating a "scala"
// parent process for the executor command
builder.environment.put("SPARK_LAUNCH_WITH_SCALA", "0")
// Add webUI log urls
val baseUrl =
s"http://$publicAddress:$webUiPort/logPage/?appId=$appId&executorId=$execId&logType="
builder.environment.put("SPARK_LOG_URL_STDERR", s"${baseUrl}stderr")
builder.environment.put("SPARK_LOG_URL_STDOUT", s"${baseUrl}stdout")
//启动进程process
process = builder.start()
val header = "Spark Executor Command: %s\n%s\n\n".format(
formattedCommand, "=" * 40)
// Redirect its stdout and stderr to files
val stdout = new File(executorDir, "stdout")
stdoutAppender = FileAppender(process.getInputStream, stdout, conf)
val stderr = new File(executorDir, "stderr")
Files.write(header, stderr, UTF_8)
stderrAppender = FileAppender(process.getErrorStream, stderr, conf)
// Wait for it to exit; executor may exit with code 0 (when driver instructs it to shutdown)
// or with nonzero exit code
val exitCode = process.waitFor()
state = ExecutorState.EXITED
val message = "Command exited with code " + exitCode
//发消息ExecutorStateChanged通知Master状态变更
worker.send(ExecutorStateChanged(appId, execId, state, Some(message), Some(exitCode)))
至此,Executor启动完成。类似地,读者可以自行阅读Spark core代码,加深对Spark机制实现的理解。此处限于篇幅,不再详述。
4.4 Shuffle触发
在第三章中,本书就shuffle的基本概念与原理为读者做了介绍。下面我们从源码的角度,来进一步剖析shuffle的触发及其他重要知识点。
4.4.1 触发Shuffle Write
从前面章节的讲解,我们知道Mapper实际上是一个任务。在前面讲Spark调度时讲过DAG调度器会在一个Stage内部划分任务。 在实际过程中,会根据Stage的不同,得到ResultTask 和 ShuffleMapTask两类任务。ResultTask会将计算结果返回给 Driver,ShuffleMapTask 则将结果传递给Shuffle 依赖中的子 RDD,并将RDD划分为多个buckets,这个操作基于ShuffleDependency中指定的partitioner来完成。所以这里我们先从ShuffleMapTask入手,来剖析Mapper的大致工作流程。请读者阅读如下代码:
private[spark] class ShuffleMapTask(
  	stageId: Int,
  	stageAttemptId: Int,
  	taskBinary: Broadcast[Array[Byte]],
  	partition: Partition,
  	@transient private var locs: Seq[TaskLocation],
  	internalAccumulators: Seq[Accumulator[Long]])
		extends Task[MapStatus](stageId, stageAttemptId, partition.index, internalAccumulators)  with Logging {

      [此处省略部分代码]

	override def runTask(context: TaskContext): MapStatus = {
  		// Deserialize the RDD using the broadcast variable.
  		val deserializeStartTime = System.currentTimeMillis()
  		val ser = SparkEnv.get.closureSerializer.newInstance()
  		val (rdd, dep) = ser.deserialize[(RDD[_], ShuffleDependency[_, _, _])](ByteBuffer.wrap(taskBinary.value), Thread.currentThread.getContextClassLoader)_executorDeserializeTime = System.currentTimeMillis() -deserializeStartTime

  		metrics = Some(context.taskMetrics)
  		var writer: ShuffleWriter[Any, Any] = null
  		try {

              /* 从ShuffleManager实例中获取该 ShuffleWriter对象 */
    			val manager = SparkEnv.get.shuffleManager
    			writer = manager.getWriter[Any, Any](dep.shuffleHandle, partitionId, context)

              /* 触发shuffle 写操作 */
    			writer.write(rdd.iterator(partition, context).asInstanceOf[Iterator[_ <: Product2[Any, Any]]])
    			writer.stop(success = true).get
  		} catch {
    			case e: Exception =>
  	    	try {
  	    	  if (writer != null) {
  	    	    writer.stop(success = false)
  	    	  }
  	    	} catch {
  	            case e: Exception =>
  	    	    log.debug("Could not stop writer", e)
  	    	}
  	    	throw e
  		}
		}

  	override def preferredLocations: Seq[TaskLocation] = preferredLocs

  	override def toString: String = "ShuffleMapTask(%d, %d)".format(stageId, partitionId)
}
由于一个任务对应当前阶段末RDD内的一个分区,因此通过rdd.iterator(partition, context)可以计算得到该分区的数据。然后便是执行 Shuffle 写操作,该操作由一个 ShuffleWriter对象实例通过调用write接口完成,在上面代码段中已说明,Spark 从 ShuffleManager 实例中获取该 ShuffleWriter对象。
在这部分的代码实现中,Spark提供的Shuffle机制有两种,那么同样地,ShuffleManager也有两个子类:
1. HashShuffleManager
2. SortShuffleManager
ShuffleManager用于提供ShuffleWriter和ShuffleReader用于Shuffle写过程和Shuffle读过程。那么同样地,HashShuffleManager也提供HashShuffleWriter和HashShuffleReader。相应地SortShffleManager 提供了SortShuffleWriter 和 HashShuffleReader(注意,并非SortShuffleReader!)。细心的读者也许已经发现,Hash Shuffle 和Sort Shuffle 的唯一区别在于 Shuffle 写过程不同,它们读的过程是完全一样的。
4.4.2 触发Shuffle Read
本节我们继续来探索Shuffle read读操作触发。在Spark实现中,聚合器中三个方法是在PairRDDFunctions.combineByKey方法中指定。事实上当新的RDD与旧RDD二者分区器不同时,此时会生成一个ShuffledRDD。下面给出combineByKey的代码实现:
def combineByKey[C](createCombiner: V => C,
    mergeValue: (C, V) => C,
    mergeCombiners: (C, C) => C,
    partitioner: Partitioner,
    mapSideCombine: Boolean = true,
    serializer: Serializer = null): RDD[(K, C)] = self.withScope {
      require(mergeCombiners != null, "mergeCombiners must be defined")
      if (keyClass.isArray) {
        if (mapSideCombine) {
          throw new SparkException("Cannot use map-side combining with array keys.")
        }
      if (partitioner.isInstanceOf[HashPartitioner]) {
        throw new SparkException("Default partitioner cannot partition  array keys.")
      }
    }
    val aggregator = new Aggregator[K, V, C](
      self.context.clean(createCombiner),
      self.context.clean(mergeValue),
      self.context.clean(mergeCombiners))
    if (self.partitioner == Some(partitioner)) {
      self.mapPartitions(iter => {
        val context = TaskContext.get()
        new InterruptibleIterator(context, aggregator.combineValuesByKey(iter, context))
      }, preservesPartitioning = true)
    } else {

      /* 分区器不同,此时产生了ShuffledRDD */
      new ShuffledRDD[K, V, C](self, partitioner)
      .setSerializer(serializer)
      .setAggregator(aggregator)
      .setMapSideCombine(mapSideCombine)
    }
}
细心的读者看到这里可能想知道如何得知ShuffledRDD采取什么办法来获取分区数据。让我们一起来看ShuffledRDD类的具体实现,代码片段如下所示:
/* ShuffledRDD.scala */

@DeveloperApi
class ShuffledRDD[K, V, C](
  	@transient var prev: RDD[_ <: Product2[K, V]], part: Partitioner)
		extends RDD[(K, C)](prev.context, Nil) {

	[此处省略部分代码...]

	/*此处设定RDD shuffle的序列化器*/
	def setSerializer(serializer: Serializer): ShuffledRDD[K, V, C] = {
  		this.serializer = Option(serializer)
  		this
		}


	/* 设定RDD shuffle的key排序 */
	def setKeyOrdering(keyOrdering: Ordering[K]): ShuffledRDD[K, V, C] = {
		this.keyOrdering = Option(keyOrdering)
  		this
		}


	/* 为RDD shuffle 设定aggregator*/
	def setAggregator(aggregator: Aggregator[K, V, C]): ShuffledRDD[K, V, C] = {
		this.aggregator = Option(aggregator)
  		this
	}


	/* 为RDD shuffle设定mapSideCombine flag */
	def setMapSideCombine(mapSideCombine: Boolean): ShuffledRDD[K, V, C] = {
  		this.mapSideCombine = mapSideCombine
  		this
	}

	override def getDependencies: Seq[Dependency[_]] = {
  		List(new ShuffleDependency(prev, part, serializer, keyOrdering, aggregator, mapSideCombine))
		}

	override val partitioner = Some(part)

	override def getPartitions: Array[Partition] = {
  		Array.tabulate[Partition](part.numPartitions)(i => new ShuffledRDDPartition(i))
	}

	/* 此处触发shuffle read */
	override def compute(split: Partition, context: TaskContext): Iterator[(K, C)] = {

  		val dep = dependencies.head.asInstanceOf[ShuffleDependency[K, V, C]]re

  		SparkEnv.get.shuffleManager.getReader(dep.shuffleHandle, split.index, split.index + 1, context)
    		.read()
    		.asInstanceOf[Iterator[(K, C)]]
		}

	override def clearDependencies() {
  		super.clearDependencies()
  		prev = null
		}

}
通过上述ShuffledRDD的具体代码实现实现可以看出,触发Shuffle读过程实际上与触发Shuffle写过程非常类似。二者首先从ShuffleManager中获取ShuffleReader,然后通过调用 ShuffleReader的read接口拉取(shuffle fetch)并计算特定分区中的数据。
4.5 Spark存储策略
在Spark开发实践中,开发者避免不了要和RDD打交道。spark应用即为通过调用RDD提供的各种transformation和action接口来实现。spark为了提高抽象层次,建立了RDD的概念,也因此在接口和实现之间降低了耦合,用户无需关心底层的实现。但是读者也许会问,RDD提供给我们的仅仅是接口的调用, 而操作的数据如何存放及访问?这部分的实现是怎么做的? 那么这就需要涉及到spark存储机制了。本节我们就spark存储机制,从源码的角度做一些提纲挈领的剖析和探索。限于篇幅,如果读者要深入每一个细节,那就要求读者深入阅读源码。
RDD类是开发者执行具体操作的类,也是存储机制的入口。这中间涉及了2个重要的类,即CacheManager类和BlockManager类,这两个类的概要介绍如下:
1. CacheManager类:是RDD和实际查询之间的中间层。
- 将RDD的信息传递给BlockManager。
- 保证每个节点不会重复读取RDD,并提供并发控制。
2. BlockManager类提供了实际的查询接口,通过MemoryStore、DiskStore和TachyonStore三个类管理具体的缓存位置。
实际上RDD中的iterator方法是缓存读取机制的入口。关于iterator的实现请参见如下代码序列:
final def iterator(split: Partition, context: TaskContext): Iterator[T] = {
	if (storageLevel != StorageLevel.NONE) {
	/* 这里调用cacheManager的方法来查询 */
	  	SparkEnv.get.cacheManager.getOrCompute(this, split, context, storageLevel)
	} else {
	/* 重新计算*/
  		computeOrReadCheckpoint(split, context)
	}
}
由上述代码实现不难发现,当存储级别不为NONE的时候,就会以Partition为分片进行缓存查询,否则就调用computeOrReadCheckpoint重新计算。用CacheManager类的getOrCompute接口调用BlockManager类的get方法来获取数据。在getOrCompute函数中顶层抽象中的Partition与底层的Block形成了联系。
下面将对这些存储机制相关的核心类来做进一步的剖析。
4.5.1 CacheManager职能
在spark的存储机制实现中,当RDD在进行计算时,通过CacheManager来获取数据,并通过CacheManager来存储计算结果。CacheManager负责将RDD的partition内容传递给BlockManager,并且 确保同一节点一次只会载入一次该RDD。在前面所讲的RDD的iterator方法中,使用了CacheManager类的getOrCompute方法来执行缓存查询,本节以这个方法为入口,来探讨CacheManager的职能。
def getOrCompute[T](
    rdd: RDD[T],
    partition: Partition,
    context: TaskContext,
    storageLevel: StorageLevel): Iterator[T] = {

  val key = RDDBlockId(rdd.id, partition.index)
  logDebug(s"Looking for partition $key")
  blockManager.get(key) match {
    case Some(blockResult) =>

      /* 分区已包含数据,因此直接返回值即可 */
      val existingMetrics = context.taskMetrics
        .getInputMetricsForReadMethod(blockResult.readMethod)
      existingMetrics.incBytesRead(blockResult.bytes)

      val iter = blockResult.data.asInstanceOf[Iterator[T]]
      new InterruptibleIterator[T](context, iter) {
        override def next(): T = {
          existingMetrics.incRecordsRead(1)
          delegate.next()
        }
      }
    case None =>
      /* 获取载入分区的锁 */
  /* 如果其他线程已持有锁,那么等待它执行完成 */
      val storedValues = acquireLockForPartition[T](key)
      if (storedValues.isDefined) {
        return new InterruptibleIterator[T](context, storedValues.get)
      }

  /* 载入分区 */
      try {
        logInfo(s"Partition $key not found, computing it")
        val computedValues = rdd.computeOrReadCheckpoint(partition, context)


	/* 如果该任务在本地运行则不必保存结果 */
        if (context.isRunningLocally) {
          return computedValues
        }

	/* 缓存value并追踪block状态更新 */
        val updatedBlocks = new ArrayBuffer[(BlockId, BlockStatus)]
        val cachedValues = putInBlockManager(key, computedValues, storageLevel, updatedBlocks)
        val metrics = context.taskMetrics
        val lastUpdatedBlocks = metrics.updatedBlocks.getOrElse(Seq[(BlockId, BlockStatus)]())
        metrics.updatedBlocks = Some(lastUpdatedBlocks ++ updatedBlocks.toSeq)
        new InterruptibleIterator(context, cachedValues)

      } finally {
        loading.synchronized {
          loading.notifyAll()
          loading.remove(key)
        }
      }
  }
}
从上述代码片段可以看出,首先调用RDDBlockId方法将要查询的Patition转化成BlockId,进而调用BlockManager类的get方法进行查询。如果查询成功,那么会把查询结果以task为单位储存起来。不难发现,即使储存级别不是NONE也有可能无法从缓存中查询到。另外,在查询过程中会出现并发,因此需要加锁。如果缓存未被命中时,那么会调用RDD中的computeOrReadCheckpoint方法来计算。这里需要注意的是,如果task在本地运行则直接返回计算结果,否则会调用putInBlockManager上传缓存,同时跟踪缓存的status来保证缓存的一致性。下面继续来探究putInBlockManager的实现逻辑,在代码实现的关键点我已经添加了注释来帮助读者理解。
private def putInBlockManager[T](
    key: BlockId,
    values: Iterator[T],
    level: StorageLevel,
    updatedBlocks: ArrayBuffer[(BlockId, BlockStatus)],
    effectiveStorageLevel: Option[StorageLevel] = None): Iterator[T] = {

  val putLevel = effectiveStorageLevel.getOrElse(level)
  if (!putLevel.useMemory) {

/*
     * 如果存储级别不是在内存里,那么可以直接将计算结果以iterator的形式传给BlockManager,而非在内存中展开
     * 调用其putIterator方法进行储存,否则要先在MemoryStore类中注册。
     * 储存结束后还要查询一下保证缓存成功。
     * [注意]此处的putIterator方法会在后面介绍BlockManager时进一步详细介绍
     */
    updatedBlocks ++=
      blockManager.putIterator(key, values, level, tellMaster = true, effectiveStorageLevel)
    blockManager.get(key) match {
      case Some(v) => v.data.asInstanceOf[Iterator[T]]
      case None =>
        logInfo(s"Failure to store $key")
        throw new BlockException(key, s"Block manager failed to return cached value for $key!")
    }
  } else {

/*
     * 如果RDD缓存在内存中的话,那么不能直接传递iterator,而是调用putArray方法将整个数组储存起来。
     * 因为将来这个partition可能会被再次查询之前从内存中删除掉,这样就会导致迭代器失效。
     * 另外要先在内存中注册,因为有可能出现内存空间不够的OOM异常。出现时会选择一个合适的partition
     * 落地到磁盘上。选择过程由MemoryStore.unrollSafely进行。
     * [注意]此处调用的putArray方法会在后面详细介绍
     */

    blockManager.memoryStore.unrollSafely(key, values, updatedBlocks) match {
      case Left(arr) =>

	/* 已成功地展开整个partition,因此缓存在了内存中 */
        updatedBlocks ++=
          blockManager.putArray(key, arr, level, tellMaster = true, effectiveStorageLevel)
        arr.iterator.asInstanceOf[Iterator[T]]
      case Right(it) =>

	/* 内存空间不够,无法在内存中缓存partition */
        val returnValues = it.asInstanceOf[Iterator[T]]
        if (putLevel.useDisk) {
          logWarning(s"Persisting partition $key to disk instead.")
          val diskOnlyLevel = StorageLevel(useDisk = true, useMemory = false, useOffHeap = false, deserialized = false, putLevel.replication)
          putInBlockManager[T](key, returnValues, level, updatedBlocks, Some(diskOnlyLevel))
        } else {
          returnValues
        }
    }
  }
}
4.5.2 BlockManager职能
由上一节内容可以看出CacheManager在进行数据读取和存取的时候主要是依赖BlockManager接口来操作,BlockManager的职能是决定数据是从内存(MemoryStore)还是从磁盘(DiskStore)中获取。并且BlockManager类提供getLocal与getRemote方法从本地或远程查询数据。在getLocal的实现中调用了doGetLocal方法,因此getLocal可以看作是doGetLocal的封装。
而doGetLocal会先通过blockdId获得blockinfo,然后取出此block的存储级别,进而进入不同分支。例如memory、tachyon或disk。而memory和tachyon本质都是在内存中储存的,但disk分支在查询到结果后还会再进行判断,判断这个block原来的储存级别是否是memory。如果是,那么将这个block载入内存。下面我们来看do GetLocal的代码实现:
private def doGetLocal(blockId: BlockId, asBlockResult: Boolean): Option[Any] = {
  val info = blockInfo.get(blockId).orNull
  if (info != null) {
    info.synchronized {

    /* 检测block是否存在,在小概率情况下,它会被removeBlock删除。
   * 即使用户有意删除block,此处的条件分支依然可以通过
   * 但最终会由于找不到block而抛出异常
   */
  if (blockInfo.get(blockId).isEmpty) {
        logWarning(s"Block $blockId had been removed")
        return None
      }


      /* 如果有其他线程正在写该block, 那么等待 */
      if (!info.waitForReady()) {
        // If we get here, the block write failed.
        logWarning(s"Block $blockId was marked as failure.")
        return None
      }

      val level = info.level
      logDebug(s"Level for block $blockId is $level")


  /* 在内存中查找block */
      if (level.useMemory) {
        logDebug(s"Getting block $blockId from memory")
        val result = if (asBlockResult) {
          memoryStore.getValues(blockId).map(new BlockResult(_, DataReadMethod.Memory, info.size))
        } else {
          memoryStore.getBytes(blockId)
        }
        result match {
          case Some(values) =>
            return result
          case None =>
            logDebug(s"Block $blockId not found in memory")
        }
      }

      /* 在外部block store中查找block */
      if (level.useOffHeap) {
        logDebug(s"Getting block $blockId from ExternalBlockStore")
        if (externalBlockStore.contains(blockId)) {
          val result = if (asBlockResult) {
            externalBlockStore.getValues(blockId)
              .map(new BlockResult(_, DataReadMethod.Memory, info.size))
          } else {
            externalBlockStore.getBytes(blockId)
          }
          result match {
            case Some(values) =>
              return result
            case None =>
              logDebug(s"Block $blockId not found in ExternalBlockStore")
          }
        }
      }


  /* 在硬盘上查找block,必要时将其载入内存 */
      if (level.useDisk) {
        logDebug(s"Getting block $blockId from disk")
        val bytes: ByteBuffer = diskStore.getBytes(blockId) match {
          case Some(b) => b
          case None =>
            throw new BlockException(
              blockId, s"Block $blockId not found on disk, though it should be")
        }
        assert(0 == bytes.position())

        if (!level.useMemory) {

      /* 若block不该被保存在内存中,则直接返回 */
          if (asBlockResult) {
            return Some(new BlockResult(dataDeserialize(blockId, bytes), DataReadMethod.Disk, info.size))
          } else {
            return Some(bytes)
          }
        } else {

	  /* 否则,在memory store中保存部分数据 */
          if (!level.deserialized || !asBlockResult) {

	    /* 当block的存储级别包括"memory serialized"时或当block应该被在内存中缓存为对象时
		 * 在内存中保存部分字节(只需要序列化的字节)
		 */
            memoryStore.putBytes(blockId, bytes.limit, () => {

	   	  /* 当文件大于内存剩余空间时,触发OOM。当无法将文件放入memory store时,copyForMemory会被创建*/
              val copyForMemory = ByteBuffer.allocate(bytes.limit)
              copyForMemory.put(bytes)
            })
            bytes.rewind()
          }
          if (!asBlockResult) {
            return Some(bytes)
          } else {
            val values = dataDeserialize(blockId, bytes)
            if (level.deserialized) {

	      /* 在返回结果之前先缓存 */
              val putResult = memoryStore.putIterator(
                blockId, values, level, returnValues = true, allowPersistToDisk = false)

		  /* 当空间不够时, put可能失败*/
              putResult.data match {
                case Left(it) =>
                  return Some(new BlockResult(it, DataReadMethod.Disk, info.size))
                case _ =>

		      /* 当value被落地到硬盘时,抛出该异常 */
                  throw new SparkException("Memory store did not return an iterator!")
              }
            } else {
              return Some(new BlockResult(values, DataReadMethod.Disk, info.size))
            }
          }
        }
      }
    }
  } else {
    logDebug(s"Block $blockId not registered locally")
  }
  None
}
查询过程中BlockManager不会直接调用底层的查询函数,而是通过MemoryStore、DiskStore等管理类代理。getRemote方法实际也是doGetRemote的包装。doGetRemote的过程比较简单,就是先获得blockinfo,然后查询自己在集群中的locations,最后持续依照locations将blockinfo发送给远端,等待任一个远端返回数据之后查询结束。接下来看一下put相关方法,在前面我们发现向BlockManager提交存储调用了如下两个接口:
1. putArray
2. putIterator
事实上,两个函数都是doPut方法的简单封装,在他们的实现中调用了doPut方法,因此下面我们重点来研究doPut方法的实现。
private def doPut(
    blockId: BlockId,
    data: BlockValues,
    level: StorageLevel,
    tellMaster: Boolean = true,
    effectiveStorageLevel: Option[StorageLevel] = None)
  : Seq[(BlockId, BlockStatus)] = {

  require(blockId != null, "BlockId is null")
  require(level != null && level.isValid, "StorageLevel is null or invalid")
  effectiveStorageLevel.foreach { level =>
    require(level != null && level.isValid, "Effective StorageLevel is null or invalid")
  }putInBlockManager

  val updatedBlocks = new ArrayBuffer[(BlockId, BlockStatus)]

/* 依据block的存储级别而正确地将其落地到硬盘。
   * 然而,除非我们对该block调用markReady,
   * 否则其他线程无法对该block调用get方法
   */

  val putBlockInfo = {
    val tinfo = new BlockInfo(level, tellMaster)
    // Do atomically !
    val oldBlockOpt = blockInfo.putIfAbsent(blockId, tinfo)
    if (oldBlockOpt.isDefined) {
      if (oldBlockOpt.get.waitForReady()) {
        logWarning(s"Block $blockId already exists on this machine; not re-adding it")
        return updatedBlocks
      }

      oldBlockOpt.get
    } else {
      tinfo
    }
  }

  val startTimeMs = System.currentTimeMillis

  /* If we're storing values and we need to replicate the data, we'll want access to the values,
   * but because our put will read the whole iterator, there will be no values left. For the
   * case where the put serializes data, we'll remember the bytes, above; but for the case where
   * it doesn't, such as deserialized storage, let's rely on the put returning an Iterator.
   */
  var valuesAfterPut: Iterator[Any] = null

  // Ditto for the bytes after the put
  var bytesAfterPut: ByteBuffer = null

  /* block的大小(bytes为单位)*/
  var size = 0L

  // The level we actually use to put the block
  val putLevel = effectiveStorageLevel.getOrElse(level)

  // If we're storing bytes, then initiate the replication before storing them locally.
  // This is faster as data is already serialized and ready to send.
  val replicationFuture = data match {
    case b: ByteBufferValues if putLevel.replication > 1 =>
      // Duplicate doesn't copy the bytes, but just creates a wrapper
      val bufferView = b.buffer.duplicate()
      Future {
        // This is a blocking action and should run in futureExecutionContext which is a cached
        // thread pool
        replicate(blockId, bufferView, putLevel)
      }(futureExecutionContext)
    case _ => null
  }

  putBlockInfo.synchronized {
    logTrace("Put for block %s took %s to get into synchronized block"
      .format(blockId, Utils.getUsedTimeMs(startTimeMs)))

    var marked = false
    try {

	  /* returnValues - 是否返回values
       * blockStore   - 存放values的存储类型
       */
      val (returnValues, blockStore: BlockStore) = {
        if (putLevel.useMemory) {

          /* 先存在内存,即使设置了useDisk为true。 若内存hold不住的时候, 将它落地到硬盘*/
          (true, memoryStore)
        } else if (putLevel.useOffHeap) {
          // Use external block store
          (false, externalBlockStore)
        } else if (putLevel.useDisk) {
          // Don't get back the bytes from put unless we replicate them
          (putLevel.replication > 1, diskStore)
        } else {
          assert(putLevel == StorageLevel.NONE)
          throw new BlockException(
            blockId, s"Attempted to put block $blockId without specifying storage level!")
        }
      }

      // Actually put the values
      val result = data match {
        case IteratorValues(iterator) =>
          blockStore.putIterator(blockId, iterator, putLevel, returnValues)
        case ArrayValues(array) =>
          blockStore.putArray(blockId, array, putLevel, returnValues)
        case ByteBufferValues(bytes) =>
          bytes.rewind()
          blockStore.putBytes(blockId, bytes, putLevel)
      }
      size = result.size
      result.data match {
        case Left (newIterator) if putLevel.useMemory => valuesAfterPut = newIterator
        case Right (newBytes) => bytesAfterPut = newBytes
        case _ =>
      }

      // Keep track of which blocks are dropped from memory
      if (putLevel.useMemory) {
        result.droppedBlocks.foreach { updatedBlocks += _ }
      }

      val putBlockStatus = getCurrentBlockStatus(blockId, putBlockInfo)
      if (putBlockStatus.storageLevel != StorageLevel.NONE) {
        // Now that the block is in either the memory, externalBlockStore, or disk store,
        // let other threads read it, and tell the master about it.
        marked = true
        putBlockInfo.markReady(size)
        if (tellMaster) {
          reportBlockStatus(blockId, putBlockInfo, putBlockStatus)
        }
        updatedBlocks += ((blockId, putBlockStatus))
      }
    } finally {
      // If we failed in putting the block to memory/disk, notify other possible readers
      // that it has failed, and then remove it from the block info map.
      if (!marked) {
        // Note that the remove must happen before markFailure otherwise another thread
        // could've inserted a new BlockInfo before we remove it.
        blockInfo.remove(blockId)
        putBlockInfo.markFailure()
        logWarning(s"Putting block $blockId failed")
      }
    }
  }
  logDebug("Put block %s locally took %s".format(blockId, Utils.getUsedTimeMs(startTimeMs)))

  // Either we're storing bytes and we asynchronously started replication, or we're storing
  // values and need to serialize and replicate them now:

  if (putLevel.replication > 1) {
    data match {
      case ByteBufferValues(bytes) =>
        if (replicationFuture != null) {
          Await.ready(replicationFuture, Duration.Inf)
        }
      case _ =>
        val remoteStartTime = System.currentTimeMillis
        // Serialize the block if not already done
        if (bytesAfterPut == null) {
          if (valuesAfterPut == null) {
            throw new SparkException(
              "Underlying put returned neither an Iterator nor bytes! This shouldn't happen.")
          }
          bytesAfterPut = dataSerialize(blockId, valuesAfterPut)
        }
        replicate(blockId, bytesAfterPut, putLevel)
        logDebug("Put block %s remotely took %s"
          .format(blockId, Utils.getUsedTimeMs(remoteStartTime)))
    }
  }

  BlockManager.dispose(bytesAfterPut)

  if (putLevel.replication > 1) {
    logDebug("Putting block %s with replication took %s"
      .format(blockId, Utils.getUsedTimeMs(startTimeMs)))
  } else {
    logDebug("Putting block %s without replication took %s"
      .format(blockId, Utils.getUsedTimeMs(startTimeMs)))
  }

  updatedBlocks
}
doPut方法的职能可以总结为如下几点:
1. 为block创建BlockInfo结构体存储block相关信息,同时将其加锁使其不能被访问。
2. 根据block的replication数决定是否将该block拷贝到远端。
3. 根据block的storage level决定将block存储到内存还是硬盘上,同时解锁标识该block已经ready,可被访问。
4.5.3 DiskStore与DiskBlockManager类
本节我们继续来探索实现具体存储落地到硬盘的过程。首先我们看一下两个重点类:
(1) DiskStore
(2) DiskBlockManager
事实上DiskStore虽然承担着将block存储到硬盘上的工作,但它仍然没有直接调用底层操作,而是用DiskBlockManager来管理。在DiskBlockManager实现中通过创建数组以哈希表的形式保存了文件的路径,而查找文件路径是通过getFile完成的,在数组中,以hash的方式来查找文件所在路径。下面我们重点来看getFile的实现:
def getFile(filename: String): File = {
  // Figure out which local directory it hashes to, and which subdirectory in that
  val hash = Utils.nonNegativeHash(filename)
  val dirId = hash % localDirs.length
  val subDirId = (hash / localDirs.length) % subDirsPerLocalDir

/* 如果子目录不存在则创建它 */
  val subDir = subDirs(dirId).synchronized {
    val old = subDirs(dirId)(subDirId)
    if (old != null) {
      old
    } else {
      val newDir = new File(localDirs(dirId), "%02x".format(subDirId))
      if (!newDir.exists() && !newDir.mkdir()) {
        throw new IOException(s"Failed to create local dir in $newDir.")
      }
      subDirs(dirId)(subDirId) = newDir
      newDir
    }
  }

  new File(subDir, filename)
}
getFile方法先根据filename计算出hash值,将hash取模获得dirId和subDirId,进而在subDirs中找出相应的subDir。如果不存在则创建一个subDir,最后以subDir为路径、filename为文件名创建文件对象,DiskBlockManager使用此文件对象将block写入硬盘或读从硬盘中读出block,详细请参见DiskStore.scala文件。
4.5.4 MemoryStore类
本节我们研究下MemoryStore类的实现。MemoryStore类的职能是将block存储到内存,一般采用如下两种方式:
(1) 以数组的方式,数组中保存了java对象的反序列化对象。
(2) 以序列化的ByteBuffers方式保存。
MemoryStore类的实现中很少比较“重”的操作,比如创建文件及文件读取等等。但在MemoryStore类中,它维护了一个java.util.LinkedHashMap[BlockId, MemoryEntry],将blockId映射到内存的入口地址。如此一来,读取block会大大简化,因为直接操作该哈希表。在保存block至内存这个功能点上,MemoryStore类提供了putBytes、putArray等方法。查阅这几个方法的实现后发现它们都是对tryToPut方法的封装。因此下面我们重点介绍tryToPut方法的代码实现。
private def tryToPut(
    blockId: BlockId,
    value: () => Any,
    size: Long,
    deserialized: Boolean): ResultWithDroppedBlocks = {

  var putSuccess = false
  val droppedBlocks = new ArrayBuffer[(BlockId, BlockStatus)]

  accountingLock.synchronized {
    val freeSpaceResult = ensureFreeSpace(blockId, size)
    val enoughFreeSpace = freeSpaceResult.success
    droppedBlocks ++= freeSpaceResult.droppedBlocks

    if (enoughFreeSpace) {
      val entry = new MemoryEntry(value(), size, deserialized)
      entries.synchronized {
        entries.put(blockId, entry)
        currentMemory += size
      }
      val valuesOrBytes = if (deserialized) "values" else "bytes"
      logInfo("Block %s stored as %s in memory (estimated size %s, free %s)".format(
        blockId, valuesOrBytes, Utils.bytesToString(size), Utils.bytesToString(freeMemory)))
      putSuccess = true
    } else {

      /* 告诉block manager无法将block放入内存中,该block可被落地到硬盘(如果该block允许在硬盘中保存的话)*/
      lazy val data = if (deserialized) {
        Left(value().asInstanceOf[Array[Any]])
      } else {
        Right(value().asInstanceOf[ByteBuffer].duplicate())
      }
      val droppedBlockStatus = blockManager.dropFromMemory(blockId, () => data)
      droppedBlockStatus.foreach { status => droppedBlocks += ((blockId, status)) }
    }
    // Release the unroll memory used because we no longer need the underlying Array
    releasePendingUnrollMemoryForThisTask()
  }
  ResultWithDroppedBlocks(putSuccess, droppedBlocks)
}
从上述tryToPut方法实现中不难看出,它首先调用ensureFreeSpace方法,确保留出足够的空间。然后函数依据在不交换空间的情况下内存是否足够而分为两支,简述如下:
(1) 若内存足够,那么直接将数据写入内存中,然后将entry加入entries哈希表。
(2) 若内存不够,可将这个block直接写到硬盘中。
至此,读者也许会问在什么情况下会导致内存不够,并且被交换的块该如何选择呢? 下面一起来继续研究ensureFreeSpace方法实现。
private def ensureFreeSpace(
    blockIdToAdd: BlockId,
    space: Long): ResultWithDroppedBlocks = {
  logInfo(s"ensureFreeSpace($space) called with curMem=$currentMemory, maxMem=$maxMemory")

  val droppedBlocks = new ArrayBuffer[(BlockId, BlockStatus)]

  if (space > maxMemory) {
    logInfo(s"Will not store $blockIdToAdd as it is larger than our memory limit")
    return ResultWithDroppedBlocks(success = false, droppedBlocks)
  }

  // Take into account the amount of memory currently occupied by unrolling blocks
  // and minus the pending unroll memory for that block on current thread.
  val taskAttemptId = currentTaskAttemptId()
  val actualFreeMemory = freeMemory - currentUnrollMemory +
    pendingUnrollMemoryMap.getOrElse(taskAttemptId, 0L)

  if (actualFreeMemory < space) {
    val rddToAdd = getRddId(blockIdToAdd)
    val selectedBlocks = new ArrayBuffer[BlockId]
    var selectedMemory = 0L

    // This is synchronized to ensure that the set of entries is not changed
    // (because of getValue or getBytes) while traversing the iterator, as that
    // can lead to exceptions.
    entries.synchronized {
      val iterator = entries.entrySet().iterator()
      while (actualFreeMemory + selectedMemory < space && iterator.hasNext) {
        val pair = iterator.next()
        val blockId = pair.getKey
        if (rddToAdd.isEmpty || rddToAdd != getRddId(blockId)) {
          selectedBlocks += blockId
          selectedMemory += pair.getValue.size
        }
      }
    }

    if (actualFreeMemory + selectedMemory >= space) {
      logInfo(s"${selectedBlocks.size} blocks selected for dropping")
      for (blockId <- selectedBlocks) {
        val entry = entries.synchronized { entries.get(blockId) }
        // This should never be null as only one task should be dropping
        // blocks and removing entries. However the check is still here for
        // future safety.
        if (entry != null) {
          val data = if (entry.deserialized) {
            Left(entry.value.asInstanceOf[Array[Any]])
          } else {
            Right(entry.value.asInstanceOf[ByteBuffer].duplicate())
          }
          val droppedBlockStatus = blockManager.dropFromMemory(blockId, data)
          droppedBlockStatus.foreach { status => droppedBlocks += ((blockId, status)) }
        }
      }
      return ResultWithDroppedBlocks(success = true, droppedBlocks)
    } else {
      logInfo(s"Will not store $blockIdToAdd as it would require dropping another block " +
        "from the same RDD")
      return ResultWithDroppedBlocks(success = false, droppedBlocks)
    }
  }
  ResultWithDroppedBlocks(success = true, droppedBlocks)
}
从ensureFreeSpace方法的实现流程中可以看出,首先它会维护一个selectedBlocks数组,该数组中保存了可供替换的的block。另外selectedMemory表示能够空出的最大空间。而selectedBlocks数组的产生过程是先遍历entries哈希表,将不属于当前待加入RDD的block加进去,在尽量保证当前RDD完全缓存到内存中的前提下,使用了FIFO淘汰机制。当selectedBlocks被生成之后,先来判断如果全部释放空间是否足够,如果不够则返回。如果足够的话,那么会依次将里面的block交换出内存,直到产生的空余空间足够。
本节我们通过对源码的分析来对spark的缓存策略做了深入探索。当开发者调用RDD.iterator时会自动触发缓存机制,将这个RDD以默认为memory的缓存级别缓存起来。同时读取缓存也是完全自动的,不需要用户干预。当内存满了之后会在尽量保证当前RDD完整的情况下,采用FIFO策略选取部分block交换至disk中以空出部分空间。而当硬盘中的block被再次用到并且缓存级别是内存时,就会自动重新读入内存中。
4.6 本章小结
本章首先与spark1.5.0的代码布局做了宏观介绍,进而对spark的执行主线做了详细剖析,从代码层面详细讲述了RDD是如何落地到worker上执行的。接着,本章又从另一个角度分析了client,master与worker之间的交互过程。最后本章深入讲述了spark的两个重要功能点及spark shuffle与spark存储机制。 学习本章的讲解后,希望读者能自行深入研究spark代码,加深对spark内部实现原理的理解。