弦外之音
很多朋友都在问我,经常看各种框架的源码会不会感到很枯燥,是什么东西在驱动着我一直看下去。其实我想说的很简单,作为一个程序员,不管你工作了多少年,能够经常学习和借鉴国内外优秀框架设计思想和程序架构,我想对我们来说是最直接的提高。
在 http://flume.apache.org 上下载flume-1.6.0版本,将源码导入到Idea开发工具后如下图所示:

一、主要模块说明
-
flume-ng-channels 里面包含了filechannel,jdbcchannel,kafkachannel,memorychannel通道的实现。
-
flume-ng-clients 实现了log4j相关的几个Appender,使得log4j的日志输出可以直接发送给flume-agent;其中有一个LoadBalancingLog4jAppender的实现,提供了多个flume-agent的load balance和ha功能,采用flume作为日志收集的可以考虑将这个appender引入内部的log4j中。
-
flume-ng-configuration 这个主要就是Flume配置信息相关的类,包括载入flume-config.properties配置文件并解析。其中包括了Source的配置,Sink的配置,Channel的配置,在阅读源码前推荐先梳理这部分关系再看其他部分的。
-
flume-ng-core flume整个核心框架,包括了各个模块的接口以及逻辑关系实现。其中instrumentation是flume内部实现的一套metric机制,metric的变化和维护,其核心也就是在MonitoredCounterGroup中通过一个Map<key, AtomicLong>来实现metric的计量。ng-core下几乎大部分代码任然几种在channel、sink、source几个子目录下,其他目录基本完成一个util和辅助的功能。
-
flume-ng-node 实现启动flume的一些基本类,包括main函数的入口(Application.java中)。在理解configuration之后,从application的main函数入手,可以较快的了解整个flume的代码。
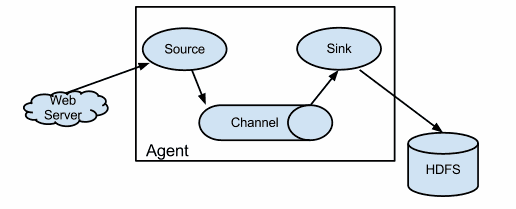
二、Flume逻辑结构图
三、flume-ng启动文件介绍
################################
# constants
################################

#设置常量值,主要是针对不同的参数执行相应的类,以启动Flume环境
FLUME_AGENT_CLASS="org.apache.flume.node.Application"
FLUME_AVRO_CLIENT_CLASS="org.apache.flume.client.avro.AvroCLIClient"
FLUME_VERSION_CLASS="org.apache.flume.tools.VersionInfo"
FLUME_TOOLS_CLASS="org.apache.flume.tools.FlumeToolsMain"

#真正启动Flume环境的方法
run_flume() {
  local FLUME_APPLICATION_CLASS

  if [ "$#" -gt 0 ]; then
    FLUME_APPLICATION_CLASS=$1
    shift
  else
    error "Must specify flume application class" 1
  fi

  if [ ${CLEAN_FLAG} -ne 0 ]; then
    set -x
  fi

  #执行这一行命令,执行相应的启动类,比如org.apache.flume.node.Application
  $EXEC $JAVA_HOME/bin/java $JAVA_OPTS $FLUME_JAVA_OPTS "${arr_java_props[@]}" -cp "$FLUME_CLASSPATH" \
      -Djava.library.path=$FLUME_JAVA_LIBRARY_PATH "$FLUME_APPLICATION_CLASS" $*
}


################################
# main
################################

# set default params
# 在启动的过程中使用到的参数
FLUME_CLASSPATH=""
FLUME_JAVA_LIBRARY_PATH=""
#默认占用堆空间大小,这一块都可以根据JVM进行重新设置
JAVA_OPTS="-Xmx20m"
LD_LIBRARY_PATH=""

opt_conf=""
opt_classpath=""
opt_plugins_dirs=""
arr_java_props=()
arr_java_props_ct=0
opt_dryrun=""

# 根据不同的参数,执行不同的启动类,每个常量所对应的类路径在代码前面有过介绍。
if [ -n "$opt_agent" ] ; then
  run_flume $FLUME_AGENT_CLASS $args
elif [ -n "$opt_avro_client" ] ; then
  run_flume $FLUME_AVRO_CLIENT_CLASS $args
elif [ -n "${opt_version}" ] ; then
  run_flume $FLUME_VERSION_CLASS $args
elif [ -n "${opt_tool}" ] ; then
  run_flume $FLUME_TOOLS_CLASS $args
else
  error "This message should never appear" 1
fi
这是其中最主要的一部分flume-ng命令行,根据重要性摘取了一段,感兴趣的读者可以自己到bin目录下查看全部。
四、从Flume-NG启动过程开始说起
从bin/flume-ng这个shell脚本可以看到Flume的起始于org.apache.flume.node.Application类,这是flume的main函数所在。
main方法首先会先解析shell命令,如果指定的配置文件不存在就抛出异常。
代码如下所示:
Options options = new Options();
Option option = new Option("n", "name", true, "the name of this agent");
option.setRequired(true);
options.addOption(option);

option = new Option("f", "conf-file", true,
    "specify a config file (required if -z missing)");
option.setRequired(false);
options.addOption(option);

option = new Option(null, "no-reload-conf", false,
    "do not reload config file if changed");
options.addOption(option);

// Options for Zookeeper
option = new Option("z", "zkConnString", true,
    "specify the ZooKeeper connection to use (required if -f missing)");
option.setRequired(false);
options.addOption(option);

option = new Option("p", "zkBasePath", true,
    "specify the base path in ZooKeeper for agent configs");
option.setRequired(false);
options.addOption(option);

option = new Option("h", "help", false, "display help text");
options.addOption(option);

 #命令行解析类
CommandLineParser parser = new GnuParser();
CommandLine commandLine = parser.parse(options, args);

if (commandLine.hasOption('h')) {
  new HelpFormatter().printHelp("flume-ng agent", options, true);
  return;
}

String agentName = commandLine.getOptionValue('n');
boolean reload = !commandLine.hasOption("no-reload-conf");

if (commandLine.hasOption('z') || commandLine.hasOption("zkConnString")) {
  isZkConfigured = true;
}
以上代码是Application类中校验shell命令行的代码,举个例子在启动flume的时候,使用如下命令行:
./bin/flume-ng agent -n agent -c conf -f conf/hw.conf -Dflume.root.logger=INFO,console
里面的-n -f等参数都是在上面代码中校验的。
再往下看main方法里的代码:
File configurationFile = new File(commandLine.getOptionValue('f'));

  /*
   * The following is to ensure that by default the agent will fail on
   * startup if the file does not exist.
   */
  if (!configurationFile.exists()) {
    // If command line invocation, then need to fail fast
    if (System.getProperty(Constants.SYSPROP_CALLED_FROM_SERVICE) ==
      null) {
      String path = configurationFile.getPath();
      try {
        path = configurationFile.getCanonicalPath();
      } catch (IOException ex) {
        logger.error("Failed to read canonical path for file: " + path,
          ex);
      }
      throw new ParseException(
        "The specified configuration file does not exist: " + path);
    }
  }
  List<LifecycleAware> components = Lists.newArrayList();

  if (reload) {
    EventBus eventBus = new EventBus(agentName + "-event-bus");
    PollingPropertiesFileConfigurationProvider configurationProvider =
      new PollingPropertiesFileConfigurationProvider(
        agentName, configurationFile, eventBus, 30);
    components.add(configurationProvider);
    application = new Application(components);
    eventBus.register(application);
  } else {
    PropertiesFileConfigurationProvider configurationProvider =
      new PropertiesFileConfigurationProvider(
        agentName, configurationFile);
    application = new Application();
    application.handleConfigurationEvent(configurationProvider
      .getConfiguration());
  }
}
application.start();
说明:
根据命令中含有”no-reload-conf”参数,决定采用那种加载配置文件方式:
一、没有此参数,会动态加载配置文件,默认每30秒加载一次配置文件,因此可以动态修改配置文件;
二、有此参数,则只在启动时加载一次配置文件。实现动态加载功能采用了发布订阅模式,使用guava中的EventBus实现。
三、PropertiesFileConfigurationProvider这个类是配置文件加载类。
类图如下:
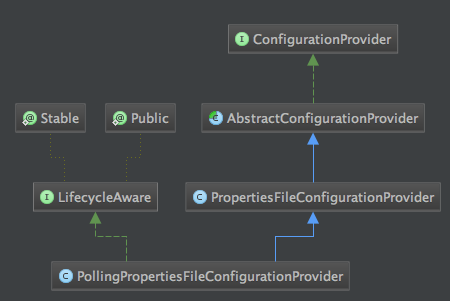
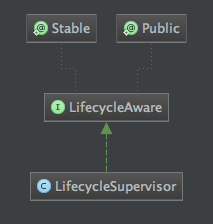
从图中可以看出在整个PollingPropertiesFileConfigurationProvider类中,它实现了LifecycleAware接口,而这个接口是掌管整个Flume生命周期的一个核心接口,LifecycleSupervisor实现了这个接口,通过上面代码中application.start方法触发LifecyleAware的start方法,下面是这个接口的方法定义及相关类代码:
public interface LifecycleAware {

  /**
   * <p>
   * Starts a service or component.
   * </p>
   * @throws LifecycleException
   * @throws InterruptedException
   */
  public void start();

  /**
   * <p>
   * Stops a service or component.
   * </p>
   * @throws LifecycleException
   * @throws InterruptedException
   */
  public void stop();

  /**
   * <p>
   * Return the current state of the service or component.
   * </p>
   */
  public LifecycleState getLifecycleState();

}
Application.start()方法内容:
public synchronized void start() {
  for(LifecycleAware component : components) {
    supervisor.supervise(component,
        new SupervisorPolicy.AlwaysRestartPolicy(), LifecycleState.START);
  }
}
LifecycleSupervisor.supervise方法内容如下:
public synchronized void supervise(LifecycleAware lifecycleAware,
    SupervisorPolicy policy, LifecycleState desiredState) {
  if(this.monitorService.isShutdown()
      || this.monitorService.isTerminated()
      || this.monitorService.isTerminating()){
    throw new FlumeException("Supervise called on " + lifecycleAware + " " +
        "after shutdown has been initiated. " + lifecycleAware + " will not" +
        " be started");
  }

  Preconditions.checkState(!supervisedProcesses.containsKey(lifecycleAware),
      "Refusing to supervise " + lifecycleAware + " more than once");

  if (logger.isDebugEnabled()) {
    logger.debug("Supervising service:{} policy:{} desiredState:{}",
        new Object[] { lifecycleAware, policy, desiredState });
  }

  Supervisoree process = new Supervisoree();
  process.status = new Status();

  process.policy = policy;
  process.status.desiredState = desiredState;
  process.status.error = false;

  MonitorRunnable monitorRunnable = new MonitorRunnable();
  monitorRunnable.lifecycleAware = lifecycleAware;
  monitorRunnable.supervisoree = process;
  monitorRunnable.monitorService = monitorService;

  supervisedProcesses.put(lifecycleAware, process);

  ScheduledFuture<?> future = monitorService.scheduleWithFixedDelay(
      monitorRunnable, 0, 3, TimeUnit.SECONDS);
  monitorFutures.put(lifecycleAware, future);
}
在上面的代码中,会创建MonitorRunnable对象,这个对象是个定时对象,里面的run方法主要是根据supervisoree.status.desiredState的值执行对应的操作。
包括:START,STOP等状态, 大家注意scheduleWithFixedDelay这个方法,这是java线程池自带的,要求每次任务执行完以后再延迟3秒,而不是每隔3秒执行一次,大家注意这一点。
又有同学会问循环调用会不会有问题,这里回应大家其实也没问题,这么做是为了重试机制,看下面代码:
if (!lifecycleAware.getLifecycleState().equals( supervisoree.status.desiredState))
在MonitorRunnable内部有这样一个判断,当getLifecycleState与supervisoree.status.desiredState状态不相等的时候才会执行,而ifecycleAware.getLifecycleState()初始状态是IDLE。
时序调用图如下所示
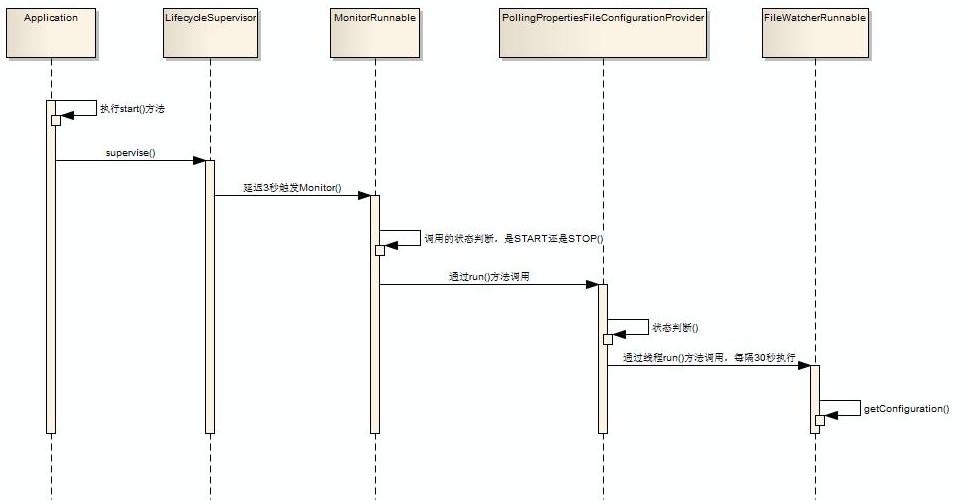
注:
PollingPropertiesFileConfigurationProvider.start()方法会启动一个单线程FileWatcherRunnable每隔30s去加载一次配置文件:
eventBus.post(getConfiguration())。
getConfiguration()解析了配置文件并且获取所有组件及配置属性
五、配置文件加载详细分析
先看一下FileWatcherRunnable内部的代码:
public MaterializedConfiguration getConfiguration() {
 //初始化三大组件的配置Map,source,channel,sink
  MaterializedConfiguration conf = new SimpleMaterializedConfiguration();
  FlumeConfiguration fconfig = getFlumeConfiguration();
  AgentConfiguration agentConf = fconfig.getConfigurationFor(getAgentName());
  if (agentConf != null) {
    Map<String, ChannelComponent> channelComponentMap = Maps.newHashMap();
    Map<String, SourceRunner> sourceRunnerMap = Maps.newHashMap();
    Map<String, SinkRunner> sinkRunnerMap = Maps.newHashMap();
    try {
      loadChannels(agentConf, channelComponentMap);
      loadSources(agentConf, channelComponentMap, sourceRunnerMap);
      loadSinks(agentConf, channelComponentMap, sinkRunnerMap);
      Set<String> channelNames =
          new HashSet<String>(channelComponentMap.keySet());
      for(String channelName : channelNames) {
        ChannelComponent channelComponent = channelComponentMap.
            get(channelName);
        if(channelComponent.components.isEmpty()) {
          LOGGER.warn(String.format("Channel %s has no components connected" +
              " and has been removed.", channelName));
          channelComponentMap.remove(channelName);
          Map<String, Channel> nameChannelMap = channelCache.
              get(channelComponent.channel.getClass());
          if(nameChannelMap != null) {
            nameChannelMap.remove(channelName);
          }
        } else {
          LOGGER.info(String.format("Channel %s connected to %s",
              channelName, channelComponent.components.toString()));
          conf.addChannel(channelName, channelComponent.channel);
        }
      }
      for(Map.Entry<String, SourceRunner> entry : sourceRunnerMap.entrySet()) {
        conf.addSourceRunner(entry.getKey(), entry.getValue());
      }
      for(Map.Entry<String, SinkRunner> entry : sinkRunnerMap.entrySet()) {
        conf.addSinkRunner(entry.getKey(), entry.getValue());
      }
    } catch (InstantiationException ex) {
      LOGGER.error("Failed to instantiate component", ex);
    } finally {
      channelComponentMap.clear();
      sourceRunnerMap.clear();
      sinkRunnerMap.clear();
    }
  } else {
    LOGGER.warn("No configuration found for this host:{}", getAgentName());
  }
  return conf;
}
说明:
一、在哪里加载的配置文件
其实是在这里,FlumeConfiguration fconfig = getFlumeConfiguration();
getFlumeConfiguration()这个方法是一个抽象方法,可以通过下图的方式查找加载方式。

我们选择PollingPropertiesFileConfigurationProvider这个,可以看到:
@Override
public FlumeConfiguration getFlumeConfiguration() {
  BufferedReader reader = null;
  try {
    reader = new BufferedReader(new FileReader(file));
    Properties properties = new Properties();
    properties.load(reader);
    return new FlumeConfiguration(toMap(properties));
  } catch (IOException ex) {
    LOGGER.error("Unable to load file:" + file
        + " (I/O failure) - Exception follows.", ex);
  } finally {
    if (reader != null) {
      try {
        reader.close();
      } catch (IOException ex) {
        LOGGER.warn(
            "Unable to close file reader for file: " + file, ex);
      }
    }
  }
  return new FlumeConfiguration(new HashMap<String, String>());
}
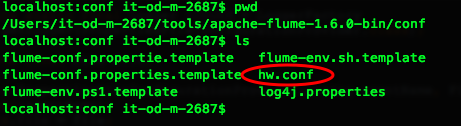
就是上面这个方法通过JAVA最基本的流的方式加载的配置文件,也就是图上面我配置的flume的hw.conf配置文件。方法读取配置文件,然后解析成name(输姓名全称,即等号左侧的全部)、value(等号的右侧)对,存入一个Map当中,返回一个封装了这个Map的FlumeConfiguration对象。
FlumeConfiguration类的构造函数会遍历这个Map的所有<name,value>对,调用addRawProperty(String name, String value)处理<name,value>对,addRawProperty方法会先做一些合法性检查,启动Flume的时候会构造一个AgentConfiguration对象aconf,然后agentConfigMap.put(agentName, aconf),以后动态加载配置文件时只需要AgentConfiguration aconf = agentConfigMap.get(agentName)就可以得到,然后调用aconf.addProperty(configKey, value)处理。
二、我们重点看一下addProperty方法内部的parseConfigKey方法,这里会深入解析每一行配置文件内容。
我们举一个配置文件的例子:
agent.sources=s1
agent.channels=c1 c2
agent.sinks=k1 k2

agent.sources.s1.type=exec
agent.sources.s1.command=tail -F /Users/it-od-m-2687/Downloads/abc.log
agent.sources.s1.channels=c1
agent.channels.c1.type=memory
agent.channels.c1.capacity=10000
agent.channels.c1.transactionCapacity=100

agent.sinks.k1.type= org.apache.flume.sink.kafka.KafkaSink
agent.sinks.k1.brokerList=127.0.0.1:9092

agent.sinks.k1.topic=testKJ1
agent.sinks.k1.serializer.class=kafka.serializer.StringEncoder

agent.sinks.k1.channel=c1
解析上面的文件就是使用下面parseConfigKey这个方法:
cnck = parseConfigKey(key, BasicConfigurationConstants.CONFIG_SINKGROUPS_PREFIX);
public final class BasicConfigurationConstants {

public static final String CONFIG_SOURCES = "sources";
public static final String CONFIG_SOURCES_PREFIX = CONFIG_SOURCES + ".";
public static final String CONFIG_SOURCE_CHANNELSELECTOR_PREFIX = "selector.";

public static final String CONFIG_SINKS = "sinks";
public static final String CONFIG_SINKS_PREFIX = CONFIG_SINKS + ".";
public static final String CONFIG_SINK_PROCESSOR_PREFIX = "processor.";

public static final String CONFIG_SINKGROUPS = "sinkgroups";
public static final String CONFIG_SINKGROUPS_PREFIX = CONFIG_SINKGROUPS + ".";

public static final String CONFIG_CHANNEL = "channel";
public static final String CONFIG_CHANNELS = "channels";
public static final String CONFIG_CHANNELS_PREFIX = CONFIG_CHANNELS + ".";

public static final String CONFIG_CONFIG = "config";
public static final String CONFIG_TYPE = "type";

private BasicConfigurationConstants() {
  // disable explicit object creation
}
1、我们用agent.sources.s1.command=s1来举例:
变量prefix指的是:sink,source,channel等关键字。
如下面代码:
public final class BasicConfigurationConstants {

public static final String CONFIG_SOURCES = "sources";
public static final String CONFIG_SOURCES_PREFIX = CONFIG_SOURCES + ".";
public static final String CONFIG_SOURCE_CHANNELSELECTOR_PREFIX = "selector.";

public static final String CONFIG_SINKS = "sinks";
public static final String CONFIG_SINKS_PREFIX = CONFIG_SINKS + ".";
public static final String CONFIG_SINK_PROCESSOR_PREFIX = "processor.";

public static final String CONFIG_SINKGROUPS = "sinkgroups";
public static final String CONFIG_SINKGROUPS_PREFIX = CONFIG_SINKGROUPS + ".";

public static final String CONFIG_CHANNEL = "channel";
public static final String CONFIG_CHANNELS = "channels";
public static final String CONFIG_CHANNELS_PREFIX = CONFIG_CHANNELS + ".";

public static final String CONFIG_CONFIG = "config";
public static final String CONFIG_TYPE = "type";

private BasicConfigurationConstants() {
  // disable explicit object creation
}
2、上面parseConfigKey方法,首先根据prefix判断prefix的后面,有少多字符。比如:sources.s1.command,在sources后面s1.command一共有10个字符。
3、解析出name变量,如s1,这个是自己定义的。
4、解析出configKey固定关键字,如command,这个是系统定义的。
5、封装new ComponentNameAndConfigKey(name, configKey)返回。
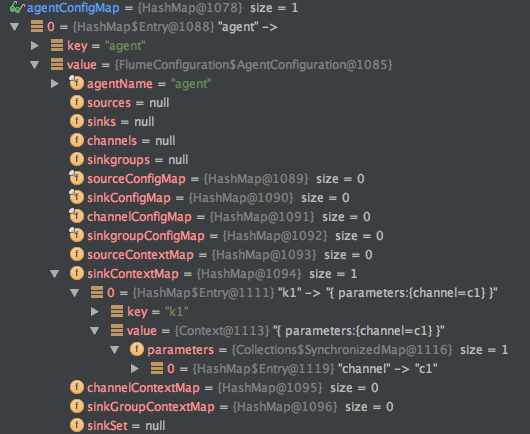
6、将sources、channel、sink配置信息,分别存放到sourceContextMap、channelConfigMap、sinkConfigMap三个HashMap,最后统一封装到AgentConfiguration对象中,然后再把AgentConfiguration存放到agentConfigMap中,key是agentName。说了这么多相信很多同学都已经晕了,agentConfigMap的结构如下图所示:
读源码是一个很痛苦的过程,不仅要分析整体框架的架构,还要理解作者的用意和设计思想,但只要坚持下来你会发现还是能学到很多东西的。